Saturday, July 14, 2007

Amy Butler Stash and Dash bag

I finished (well almost) this bag last Sunday, but just haven't gotten around to posting it.

May I present to you the Amy Butler Stash and Dash Bag....... And here is the lining..... The reason I say that it is not quit done is that the lining is not all the way sewn up. Yesterday I needed a little bag to go to the pool with and it was sitting there so off I went!

I will have a full review done by some time next week.

Sneak Peek: Here is a sneak peak of what I currently am working on, hope to get it done this weekend!

Friday, June 29, 2007

Review of Simplicity 4127

Pattern Description: Taken from envelope, “Misses’ Tops with Bodice and Hemline Variations.” Pattern Sizing : H5 (6-14) and P5 (12-20)

Did it look like the photo/drawing on the pattern envelope once you were done sewing with it? Yes, very much so, due to the use of eyelet fabric.

Were the instructions easy to follow? For the most part. The instructions weren’t bad, I just feel that they left out some information, nothing you can’t figure out with a bit of brain power.

What did you particularly like or dislike about the pattern? What drew me to this pattern was the style. In the summer I prefer to were tank tops and I also liked the idea of using eyelet fabric as it is currently “IN”. I chose this version of the top because I could make a top without having to hem it.

Fabric Used: I used a galloon-edged eyelet fabric purchased from Joann’s along with a 100% batiste (lining) also purchased for Joann’s.

Pattern Alterations or any design changes you made: I did not change the pattern at all, the only thing that I added was to line the entire top, the pattern just has you line the bodice, but I wanted some modesty around the stomach area as the fabric was quite see through. I also added an invisible zipper to this top as many of my rtw tops include invisible zippers.

Would you sew it again? Would you recommend it to others? I will probably not sew this version again because I really don’t need another eyelet top, but maybe another version sometime. I have so many other projects I want to work on first! I would recommend this top to other though. It didn’t take much time and turned out fine.

Conclusion Not bad as my first completed top (well I still haven’t finished puting in the hook and eye yet).

*****************************************************

During the construction of this top is when the Singer was driving me crazy. One day I worked on the top for 2 hours, I spent about 45 minutes of that fighting the sewing machine!

To Dawn: Yes Janome makes the new Kenmores, but I went ahead and purchased the Janome because I have a dealer very close by, so if I ever have any questions I can go over and ask!

Thursday, June 28, 2007

A new top complete with a new machine!

Well I finished the top that I wrote about, but haven't had (made) the time to write a review.

Here is the top I made - review will be coming shortly:
Simplicity 4127 Design A

Instead I started on another project, the Amy Butler Stash and Dash bags.

In other sewing related news I purchased a new sewing machine, a Janome Decor Computer 3050!!

So far I love this sewing machine! The singer that I got for Christmas had a very inconsistent stitch tension, jamming, and much more, but frankly it's not even worth talking (writing) about. The Janome so far has been wonderful. There has only been one mishap so far and I know it was operator error. There are so many stitches, super easy one-step buttonhole, automatic locking and reverse stitches, very quite, etc. This machine makes me want to work on my sewing! I will probably write a formal review on this sewing machine on patternreview.com in a couple of months.

Anyway off to bed I go. Happy Sewing Everyone!

Thursday, June 21, 2007

Discontinued HotPatterns!

Last night I recieved an email from http://www.hotpatterns.com/:
"HotPatterns Ebay store is now open! We're delighted to announce the opening of our new Ebay store. We've had a huge warehouse clear-out, so we're offering the last few of our discontinued and OOP patterns here at knock-down prices. If you missed these styles the first time around, now's the time to get them as we won't be re-printing any of these featured styles again! Look out for more OOP HotPatterns being added in the next few days...we'll also be adding some of our personal stash of vintage patterns soon, so save us to your 'favorite sellers' and visit often. Click here>>>HotPatterns Ebay store to go straight to the store!"
I purchased this:
And this:

These may be a bit beyond my skill level, but hey I can work on it anyway.

In other news I have put my tunic away for a bit and am working on another top right now. Hope to have a review by the weekend!

Thursday, May 31, 2007

My Little Bit of Un-Progress for the Day

Thanks to Dawn's comments, I decided to start ripping out the seams of the tunic a little bit at a time. Unfortunately I "upgraded" ha to haloscan for comments, which lost all of my comments that I had. Blogger doesn't really do it for me, sometimes I would get am email, other times I wouldn't. Sorry for getting off track, back to sewing. I ripped out the seam under the bust that went all the way around. I plan to take maybe an inch off there and hand baste it back together, after I retrace the front bust curves, per Dawn's suggestion. Hopefully this will work out and then I can start with the side seams when I get it the way I want. I guess that is all I have accomplished on the tunic since the last post.

Tuesday, May 29, 2007

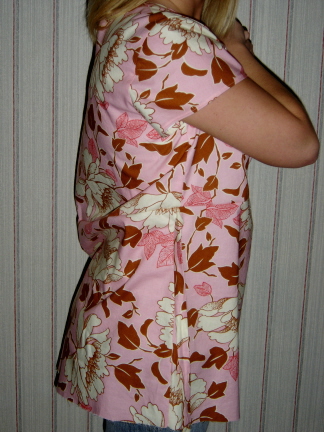
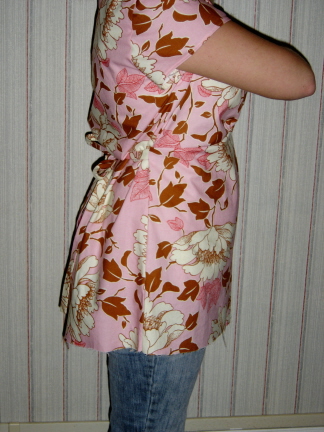
Tunic on the edge of BIG!

No that I have almost finished the tunic I think I probably should have made the Tunic a couple of sizes smaller!
The fit I think could be fixed though. I was hoping that I could get some expert suggestions on what I should do. (or what I shouldn't do)
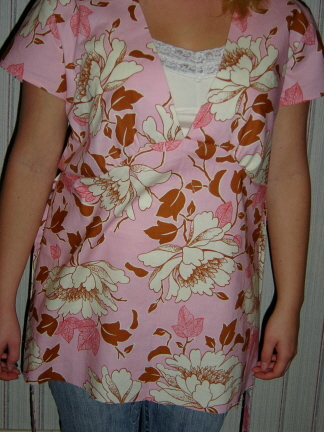
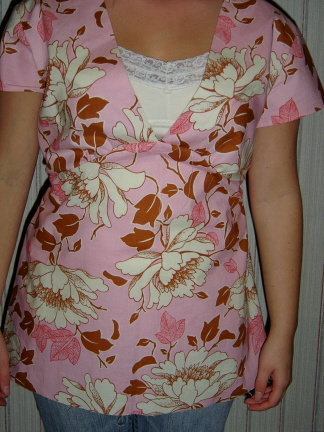
Front Untied Front Tied
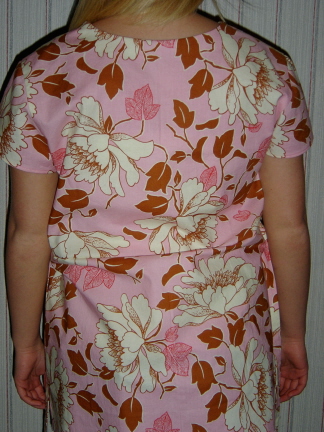
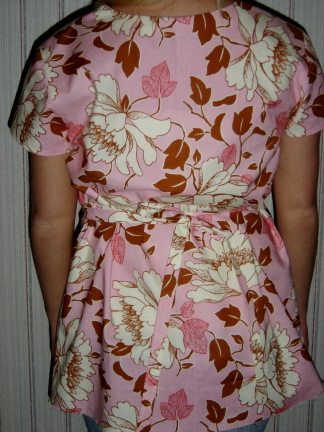
Back Untied Back tied
Side Untied Side Tied
I would like the gathered front seam to be under the bust. I was thinking that I could get out my pattern piece and trace the bust curve up an 1/2" to 1". I would also like to raise the back seam even with the bottom of my bra. I think I would also like to take in the side seams around a 1/2". I haven't pressed the side seams or the gathered seams around the bust as I knew I wanted to make some changes. I know that I also want to take the hem up by probably an 1" or 1 1/2".
I really want this to fit correctly, so I hope that you experts out there may be able to point out what I should try to do!
Happy Sewing!

Sunday, May 27, 2007

Beginning of Summer and an Update on the Prairie Girl Tunic

Ah... Summertime! This year we decided to have a little barbecue. It's been kinda rainy here the last couple of days, luckily the sky cleared tonight and became nice enough for our barbecue.

My Mom also made a Peanut Butter Crisp Dessert and yesterday we went to one of my favorite Antique shops. They were forced to move so they were having a moving sale and I got this gorgeous cake display (with the dessert inside)!

Update on the tunic - I got the sleeves set in. I messed up a bit on the first sleeve, but the second went in perfectly! I also completed the ties last night. Of course I forgot that I would have to turn it and couldn't figure out how to do it. I was finally able to turn it using a hanger. I was going to go to Joann's and get one of those tube turner thingys, but I forgot while I was there. So today I got the front skirt sewn to the back skirt. I decided to try it on and realized it was a bit big. So I think I am going to sew it all together and not hem it yet. Then pinch out the extra.

Monday, May 21, 2007

Prairie Girl Progress

I'm slowly making progress on the tunic top. Not because the pattern is difficult, just because other things. I did want to post a picture of my progress though. So here it is~~
So far I have the back neck facing in and the shoulder and side seams finished. Next is the sleeves, which I am a little nervous about since I have never done sleeves. Now that I think about it this will be my first top! I've read about how the arm holes and sleeves sometimes stretch out and that is what is making me nervous.
Anyway my plans for today is to start working on the sleeves.
There is one thing that confused me when cutting out this pattern that I wanted to mention but forgot in my last post. In the directions it tells you to cut 2 ties, cut 2 sleeves, cut 2 bodice fronts. The directions didn't come with a layout guide, which was fine (I'm a big girl I can figure it out). First I should say that I had folded the fabric in half, like the patterns I had worked with before. This works good with all the pieces on the fold. This was fine and dandy until I got to those pieces that said cut 2. Probably to someone other than a newbie would have gotten this but for the life of me I couldn't figure out why I need 4 arm pieces and 4 bodice pieces, the tie sounded fine with four pieces. I finally decided that they must make the directions in case you were cutting each piece separately. I guess this goes with the saying "You learn something new everyday" or in my case on every project!

Thursday, May 17, 2007

The beginning of a tunic..

I finally got all the pieces of the prairie girl tunic traced and cut out. I had been reading about rotary cutters and mats and that they were easier and faster. So last night I went out and bought a rotary cutter and mat. It seems to be working ok, but it seems that I have to press really hard to cut and sometimes it don't even cut through both, a whole 2, layers of fabric. Is this something that always happens or am I doing something wrong? Any suggestions? Anyway I plan to work on constructing the tunic tomorrow. For this I decided not to make a muslin, hopefully this was not a bad choice.